


Soil Sensor - Analog Capacitive soil Moisture Sensor
SKU: BP2003

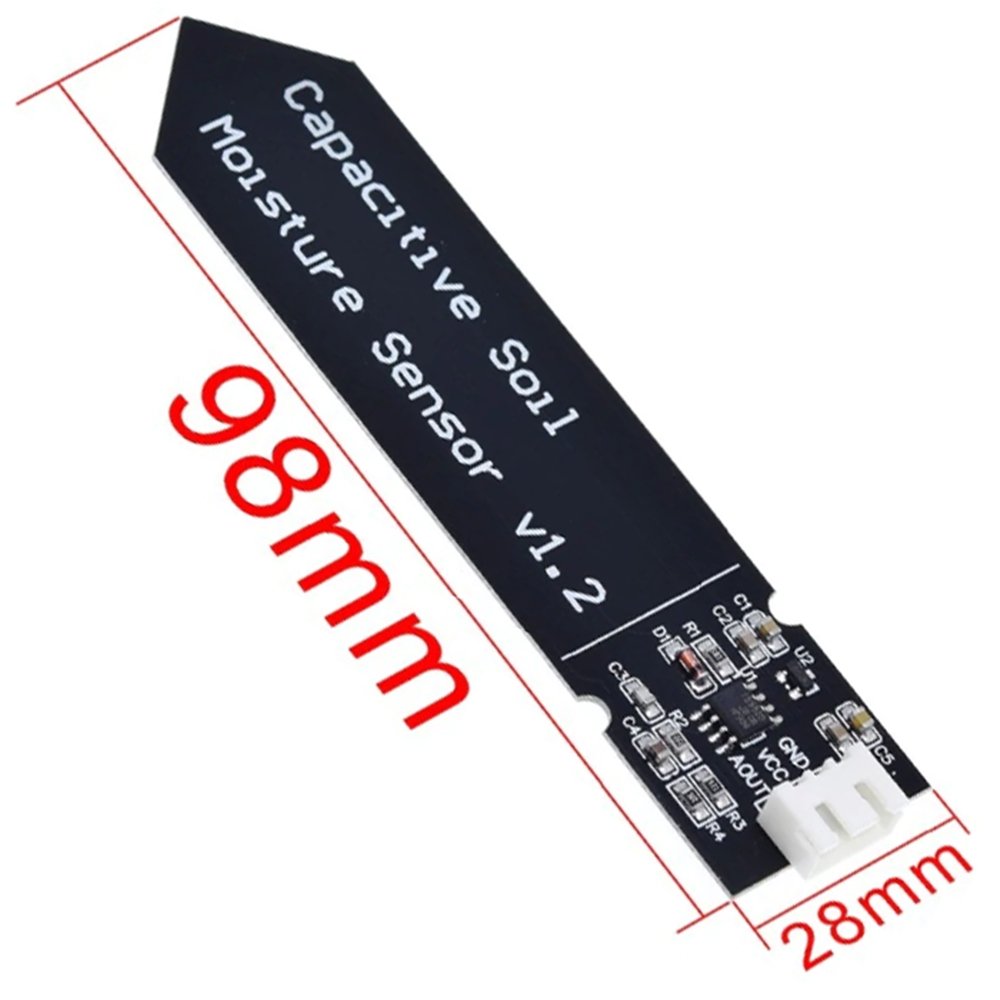


The Capacitive Soil Moisture Sensor v1.2 is a 3-wire analog module that measures how wet soil is, for Arduino, ESP32 and Raspberry Pi Pico projects.
It reads soil moisture with a coated PCB instead of bare metal probes and gives you one analog voltage to read. Use it to build plant monitors, watering reminders and automatic irrigation.
| Electrical | |
|---|---|
| Operating voltage | 3.3–5.5 V DC |
| Output signal | Analog (one wire, AOUT) |
| Output voltage | Up to about 3.0 V DC in dry air; the voltage falls as the soil gets wetter |
| Supply current | About 5 mA |
| Onboard regulator | Yes |
| Interface | |
| Pins | 3: GND, VCC, AOUT |
| Cable | 3-wire cable (black, red, yellow) ending in a 3-pin female plug |
| Cable length | 22 cm |
| Physical | |
| Sensing method | Capacitive |
| Size (PCB) | 98 mm × 28 mm |
| Platform | Works | Notes |
|---|---|---|
| Arduino UNO / Nano (5 V) | ✓ Yes | Run the sensor from 5 V and read it on an analog pin (A0). |
| ESP32 (3.3 V) | ✓ Yes | Use an ADC1 pin such as GPIO34 so Wi-Fi does not interfere. |
| Raspberry Pi Pico | ✓ Yes | Use GP26, GP27 or GP28 (the three analog inputs). |
| Raspberry Pi (full-size) | ◐ With adapter | It has no analog inputs. Add an external ADC board first. |
| Software | ✓ Yes | Arduino IDE (no library needed) or MicroPython. |
What you'll build: a moisture meter that prints a reading and a 0–100 % value every second on your computer. · About 20 minutes.
| Board | Logic voltage | Pins used | Language | Best for |
|---|---|---|---|---|
| Arduino UNO | 5 V | A0 | C++ (Arduino IDE) | First-timers |
| ESP32 | 3.3 V | GPIO34 | C++ (Arduino IDE) | Wi-Fi plant monitors |
| Raspberry Pi Pico | 3.3 V | GP26 | MicroPython (Thonny) | Learning Python |
New to this? Start with the Arduino UNO.
The sensor board acts like a capacitor, and wet soil changes its capacitance. The electronics turn that change into a voltage on the AOUT wire. Dry soil gives a higher voltage and wet soil gives a lower one. Your board reads that voltage with an analog-to-digital converter (ADC).
You need: Arduino UNO R3, a USB data cable, the sensor and its cable (the plug on the end fits 3 header pins).
■ Power ■ GND ■ Signal ■ I2C / SPI / UART ■ Other ⌒ = wires cross, not connected
| # | Arduino UNO pin | Sensor pin | Wire | Notes |
|---|---|---|---|---|
| 1 | 5V | VCC | Red | Sensor works from 3.3–5.5 V |
| 2 | GND | GND | Black | Shared ground |
| 3 | A0 | AOUT | Yellow | Analog signal, reads 0–1023 |
Check the pin labels printed on your board and next to the sensor connector (GND, VCC, AOUT) before you plug in.
Watch out: Unplug the USB cable before you move any wire. Keep the electronics at the top of the board dry.
// Wiring: GND->GND, VCC->5V, AOUT->A0
const int SENSOR_PIN = A0;   // AOUT (yellow wire) goes to A0
const int DRY_VALUE = 614;   // you can change this: reading with the sensor in dry air
const int WET_VALUE = 245;   // you can change this: reading with the sensor in water up to the line

void setup() {
  Serial.begin(115200);                       // speed of the Serial Monitor
  Serial.println("OK - epartners.co.nz test"); // shown once at start-up
}

void loop() {
  int raw = analogRead(SENSOR_PIN);                       // 0-1023 on the UNO
  int percent = map(raw, DRY_VALUE, WET_VALUE, 0, 100);   // dry = 0 %, wet = 100 %
  percent = constrain(percent, 0, 100);                   // keep it between 0 and 100
  Serial.print("Raw: ");
  Serial.print(raw);
  Serial.print("  Moisture: ");
  Serial.print(percent);
  Serial.println(" %");
  delay(1000);                                            // you can change this: one reading per second
}
✓ Check: You see OK - epartners.co.nz test once, then a Raw number and a Moisture % every second. The number drops when you touch the sensor with a wet finger.
You need: ESP32 DevKitC (ESP32-WROOM-32), a USB data cable, the sensor and its cable.
■ Power ■ GND ■ Signal ■ I2C / SPI / UART ■ Other ⌒ = wires cross, not connected
| # | ESP32 pin | Sensor pin | Wire | Notes |
|---|---|---|---|---|
| 1 | GPIO34 | AOUT | Yellow | ADC1 input. Safe to use with Wi-Fi |
| 2 | GND | GND | Black | Shared ground |
| 3 | 3V3 | VCC | Red | Power the sensor from 3.3 V |
Check the pin labels printed on your board and next to the sensor connector (GND, VCC, AOUT) before you plug in.
Watch out: ESP32 pins are 3.3 V only. Never feed a 5 V signal into a GPIO. Use an ADC1 pin like GPIO34: ADC2 pins cannot read analog values while Wi-Fi is on.
// Wiring: GND->GND, VCC->3V3, AOUT->GPIO34
const int SENSOR_PIN = 34;    // AOUT (yellow wire) goes to GPIO34 (ADC1, input only)
const int DRY_VALUE = 3723;   // you can change this: reading with the sensor in dry air
const int WET_VALUE = 1489;   // you can change this: reading with the sensor in water up to the line

void setup() {
  Serial.begin(115200);                          // speed of the Serial Monitor
  analogReadResolution(12);                      // 0-4095
  analogSetPinAttenuation(SENSOR_PIN, ADC_11db); // lets the ADC read up to about 3 V
  Serial.println("OK - epartners.co.nz test");   // shown once at start-up
}

void loop() {
  int raw = analogRead(SENSOR_PIN);                       // 0-4095 on the ESP32
  int percent = map(raw, DRY_VALUE, WET_VALUE, 0, 100);   // dry = 0 %, wet = 100 %
  percent = constrain(percent, 0, 100);                   // keep it between 0 and 100
  Serial.print("Raw: ");
  Serial.print(raw);
  Serial.print("  Moisture: ");
  Serial.print(percent);
  Serial.println(" %");
  delay(1000);                                            // you can change this: one reading per second
}
✓ Check: You see OK - epartners.co.nz test once, then a Raw number and a Moisture % every second.
You need: Raspberry Pi Pico (RP2040), a micro-USB data cable, the sensor and its cable.
■ Power ■ GND ■ Signal ■ I2C / SPI / UART ■ Other ⌒ = wires cross, not connected
| # | Pico pin | Sensor pin | Wire | Notes |
|---|---|---|---|---|
| 1 | GP26 (pin 31) | AOUT | Yellow | ADC0, one of the three analog inputs (GP26–GP28) |
| 2 | GND (pin 33) | GND | Black | Shared ground |
| 3 | 3V3(OUT) (pin 36) | VCC | Red | Not VBUS (pin 40), which is 5 V |
Check the pin labels printed on your board and next to the sensor connector (GND, VCC, AOUT) before you plug in.
Watch out: Pico pins are 3.3 V only. Power the sensor from 3V3(OUT), pin 36, and unplug USB before you change any wire.
# Wiring: GND->GND (pin 33), VCC->3V3(OUT) (pin 36), AOUT->GP26 (pin 31)
from machine import ADC, Pin
import time

SENSOR_PIN = 26      # AOUT (yellow wire) goes to GP26 (ADC0)
DRY_VALUE = 59578    # you can change this: reading with the sensor in dry air
WET_VALUE = 23831    # you can change this: reading with the sensor in water up to the line

sensor = ADC(Pin(SENSOR_PIN))
print("OK - epartners.co.nz test")   # shown once at start-up

while True:
    raw = sensor.read_u16()                                        # 0-65535 on the Pico
    percent = (raw - DRY_VALUE) * 100 // (WET_VALUE - DRY_VALUE)   # dry = 0 %, wet = 100 %
    percent = max(0, min(100, percent))                            # keep it between 0 and 100
    print("Raw:", raw, " Moisture:", percent, "%")
    time.sleep(1)                                                  # you can change this: one reading per second
✓ Check: The Shell shows OK - epartners.co.nz test once, then a Raw number and a Moisture % every second. The Pico reads 0–65535, so its Raw numbers are bigger than on the UNO.
| Board | Problem | Likely cause | Fix |
|---|---|---|---|
| All | Raw number never changes | AOUT wire loose or on the wrong pin | Check the yellow wire goes to the pin in the table (A0, GPIO34 or GP26). |
| All | Moisture % stuck at 0 or 100 | DRY_VALUE and WET_VALUE do not match your sensor | Calibrate again: dry air for DRY_VALUE, water up to the line for WET_VALUE. |
| All | Reading goes down when the soil gets wetter | Normal for this sensor | The voltage falls as moisture rises. The code already turns it into 0–100 %. |
| All | Readings jump around | Loose cable or a long, untidy wire run | Push the plug in firmly, keep wires short, and take a few readings and average them. |
| Arduino UNO | Port missing in the IDE | Charge-only cable or missing USB driver | Use a data USB cable and install the USB driver for your board. |
| ESP32 | Stuck on “Connecting…” | Board not in upload mode | Hold the BOOT button until uploading starts. |
| ESP32 | Upload fails or stops part-way | Upload speed too high for the USB cable or USB chip | Tools → Upload Speed → 115200, then upload again. |
| Raspberry Pi Pico | No RPI-RP2 drive appears | BOOTSEL was not held while plugging in | Unplug, hold BOOTSEL, plug in again, then release. |
Try next: light an LED or sound a buzzer when the moisture drops below 30 %. Or switch a small low-voltage water pump through a relay module to build an automatic plant waterer.
Spotted a problem in this tutorial? Email support@epartners.co.nz and we'll check it and update the tutorial.
| Product | Key difference | Best for |
|---|---|---|
| This product | Analog output only (AOUT). Capacitive sensing. 3.3–5.5 V. PCB 98 × 28 mm. | Reading a smooth moisture value on an analog pin. |
| Soil Humidity Detection/Moisture Water Sensor Module | Analog and digital outputs, adjustable sensitivity with an on-board potentiometer, LM393 comparator, 3.3–5 V, PCB 3 cm × 1.6 cm. | A simple wet/dry switch signal, or an analog reading from a small board. |
Yes. It runs from 3.3–5.5 V DC, so you can power it from the 3V3 pin of an ESP32 or Raspberry Pi Pico.
The output voltage falls as the soil gets wetter and is highest in dry air. The tutorial code converts this into a 0–100 % value.
Only with an external ADC board, because a full-size Raspberry Pi has no analog inputs. A Raspberry Pi Pico can read it directly on GP26–GP28.
Only up to the line printed on the board. The components above the line are not waterproof.
Technical question about this part? Email support@epartners.co.nz with your board and wiring, and we'll help you get it working.
Shipping: $5.99 urban, $9.99 rural. Free shipping on orders of $100 or more.
Order by 10:30am (NZT), Monday to Friday, and we dispatch the same day. Orders placed after 10:30am, on weekends or on public holidays are dispatched the next business day.
Delivery usually takes 1–2 business days after dispatch (2–3 for rural addresses). See our Shipping Policy for full details.