
ESP32 Development Board - Type C USB Interface

ESP32 development board with USB-C port, ESP32-WROOM-32 module, BOOT and EN buttons and 30 header pins
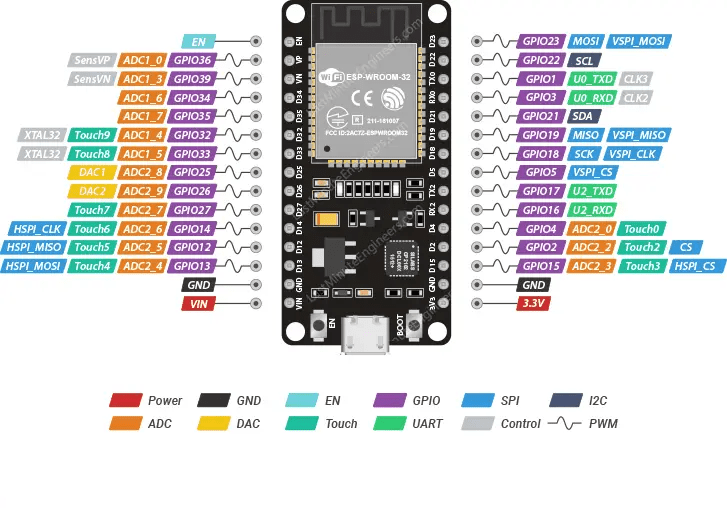
ESP32-WROOM-32 30-pin board pinout diagram showing GPIO, ADC, DAC, touch, UART, SPI and I2C pin functions

ESP32 Development Board - Type C USB Interface

Default
Regular price $13.99
/
  • Free shipping on all orders over $100
  • Secure payments
  • Low stock - 6 items left
  • Inventory on the way

Add $100.00 more for free shipping

Tax included. Shipping calculated at checkout.

An ESP32-WROOM-32 development board with a USB-C port, dual-core 240 MHz processor, 4 MB flash, 2.4 GHz Wi-Fi and Bluetooth 4.2 (Classic + BLE).

Plug it into your computer with a USB-C data cable and program it straight from the Arduino IDE, MicroPython or ESP-IDF — no separate programmer needed. It suits makers, students and engineers building Wi-Fi sensors, web-controlled devices, Bluetooth gadgets and home-automation nodes.

Module
ESP32-WROOM-32
Wireless
Wi-Fi 2.4 GHz + BT 4.2
Logic level
3.3 V
USB
USB-C

Why choose it

  • Wi-Fi and Bluetooth in one board — 802.11 b/g/n Wi-Fi plus Bluetooth v4.2 BR/EDR and BLE from the ESP32-WROOM-32 module, with an on-board PCB antenna.
  • Enough power for real projects — Xtensa dual-core 32-bit LX6 CPU at up to 240 MHz, 520 KB SRAM and 4 MB SPI flash, so you can run a web server, sensors and a display at the same time.
  • USB-C and one-click uploads — reversible USB-C connector for power and programming, with BOOT and EN buttons on the board for flashing and reset.

Specifications

Core
Module ESP32-WROOM-32
CPU Xtensa dual-core 32-bit LX6, up to 240 MHz
Memory 520 KB SRAM, 448 KB ROM
Flash 4 MB SPI flash
Wireless
Wi-Fi 802.11 b/g/n, 2.4 GHz (2412–2484 MHz); Station, Access Point and AP + Station modes
Bluetooth v4.2 BR/EDR (Classic) and Bluetooth LE
Antenna On-board PCB antenna
I/O and peripherals
Header pins 30 (2 × 15)
ADC 2 × 12-bit SAR ADC, 18 channels (chip)
DAC 2 × 8-bit (GPIO 25, GPIO 26)
Touch 10 capacitive touch channels (chip)
Interfaces 3 × UART, 4 × SPI controllers, 2 × I2C, I2S, TWAI (CAN 2.0), SD/SDIO
PWM 16 LED PWM channels, motor-control PWM
On-board USB-C connector, BOOT and EN (reset) buttons, power LED, user LED on GPIO 2
Power and environment
Logic level 3.3 V (GPIO are not 5 V tolerant)
Power input 5 V via USB-C, or 5 V on the VIN pin
Module supply 3.0–3.6 V
Operating temperature –40 to 85 °C (module)

Compatibility

Platform Works Notes
Arduino UNO / Nano (5 V) ◐ With adapter Use a logic level shifter on any 5 V signal going into the ESP32 (e.g. UART TX from the UNO).
ESP32 / ESP8266 (3.3 V) ✓ Yes Same 3.3 V logic — connect UART, I2C or SPI directly and share GND.
Raspberry Pi ✓ Yes 3.3 V GPIO on both sides; connect by UART/I2C or plug into the Pi's USB port to program it.
Arduino IDE ✓ Yes Board package "esp32 by Espressif Systems"; board "ESP32 Dev Module"
MicroPython ✓ Yes Generic ESP32 firmware from micropython.org
ESP-IDF / ESPHome ✓ Yes ESP-IDF target "esp32" (FreeRTOS + lwIP); ESPHome board "esp32dev"

In the box

Included
  • 1 × ESP32 development board (ESP32-WROOM-32, USB-C)

Applications

  • Wi-Fi sensor nodes that post temperature, humidity or soil readings to a web page, MQTT broker or Home Assistant
  • Web-controlled relays, lights and motors using the board's built-in web server
  • Bluetooth LE beacons, BLE sensors and Bluetooth Classic serial links to a phone
  • ESPHome devices for home automation
  • Learning C/C++ or MicroPython on a powerful, low-cost microcontroller

Tutorial

What you'll build: first a blinking LED, then a web page on your phone that switches the board's LED on and off over Wi-Fi · About 30 minutes.

Part 1 — Set up the Arduino IDE (once only)

1
Install Arduino IDE 2
Download the Arduino IDE for Windows, macOS or Linux and install it.
2
Add the Espressif board URL
Open File → Preferences (macOS: Arduino IDE → Settings). In Additional boards manager URLs paste:
https://espressif.github.io/arduino-esp32/package_esp32_index.json
Click OK. This is the stable release link from the official Espressif installation guide.
3
Install the ESP32 board package
Open Tools → Board → Boards Manager, search for esp32 and install esp32 by Espressif Systems. Restart the IDE when it finishes.

✓ Check: Tools → Board now shows an esp32 group.

Part 2 — Upload your first sketch

4
Connect the board and pick the port
Plug the board in with a USB-C data cable (charge-only cables will not show a port). Choose Tools → Board → esp32 → ESP32 Dev Module, then Tools → Port → the new COM port (Windows) or /dev/cu.usbserial… / /dev/ttyUSB0 (macOS/Linux). No new port? See the first row of Troubleshooting below.
5
Upload Example 1
Paste Example 1 into a new sketch and click Upload (→). When the log shows "Hard resetting via RTS pin…", the upload is done.
6
If the upload fails
Open Tools → Upload Speed, choose 115200 and upload again. If the log shows "Connecting……" and then fails, upload again and hold BOOT for a couple of seconds as the dots appear.
▸ Example 1 — Blink the on-board LED
// Example 1: blink the on-board user LED (GPIO 2)
// Wiring: nothing to connect - just the USB-C data cable
const int LED_PIN = 2;          // on-board LED next to the "D2" label
const int BLINK_MS = 1000;      // ✏️ you can change this (time in milliseconds)

void setup() {
  Serial.begin(115200);         // 115200 = the speed the board talks to your computer
  delay(500);                   // give the Serial Monitor a moment to connect
  pinMode(LED_PIN, OUTPUT);
  Serial.println("OK - epartners.co.nz test");   // printed once at start-up
}

void loop() {
  digitalWrite(LED_PIN, HIGH);  // LED on
  Serial.println("LED on");
  delay(BLINK_MS);

  digitalWrite(LED_PIN, LOW);   // LED off
  Serial.println("LED off");
  delay(BLINK_MS);
}

✓ Check: Open Tools → Serial Monitor and set it to 115200 baud. Press EN once: it prints "OK - epartners.co.nz test", then "LED on" / "LED off" every second while the user LED blinks.

Part 3 — First real project: control the LED from your phone over Wi-Fi

7
Enter your Wi-Fi details and upload
In Example 2, replace YOUR_WIFI_NAME and YOUR_WIFI_PASSWORD with your 2.4 GHz network (the ESP32 cannot join a 5 GHz-only network). Upload, then open the Serial Monitor at 115200 baud and press EN to restart the board. The Wi-Fi functions are described in the Arduino-ESP32 Wi-Fi API.
8
Open the web page
The Serial Monitor prints an address such as http://192.168.1.50. Type it into a browser on a phone or computer on the same network, then tap ON or OFF.
▸ Example 2 — Wi-Fi web server LED switch
// Example 2: switch the on-board LED from a web page
// Wiring: nothing to connect - uses the on-board LED on GPIO 2
#include <WiFi.h>
#include <WebServer.h>

const char* ssid     = "YOUR_WIFI_NAME";      // ✏️ your 2.4 GHz network name
const char* password = "YOUR_WIFI_PASSWORD";  // ✏️ your Wi-Fi password

const int LED_PIN = 2;          // on-board LED
bool ledOn = false;

WebServer server(80);           // port 80 = normal web pages

String page() {
  String html = "<!DOCTYPE html><html><head>";
  html += "<meta name='viewport' content='width=device-width, initial-scale=1'>";
  html += "<title>ESP32 LED</title></head><body style='font-family:sans-serif;text-align:center'>";
  html += "<h1>ESP32 LED is ";
  html += ledOn ? "ON" : "OFF";
  html += "</h1><p><a href='/on'><button>ON</button></a> ";
  html += "<a href='/off'><button>OFF</button></a></p></body></html>";
  return html;
}

void handleRoot() { server.send(200, "text/html", page()); }

void handleOn() {
  ledOn = true;
  digitalWrite(LED_PIN, HIGH);
  server.send(200, "text/html", page());
}

void handleOff() {
  ledOn = false;
  digitalWrite(LED_PIN, LOW);
  server.send(200, "text/html", page());
}

void setup() {
  Serial.begin(115200);
  pinMode(LED_PIN, OUTPUT);
  digitalWrite(LED_PIN, LOW);

  WiFi.mode(WIFI_STA);          // join your router as a normal device
  WiFi.begin(ssid, password);
  Serial.print("Connecting to Wi-Fi");
  while (WiFi.status() != WL_CONNECTED) {
    delay(500);
    Serial.print(".");
  }
  Serial.println();
  Serial.print("Open http://");
  Serial.println(WiFi.localIP());  // type this address into your browser

  server.on("/", handleRoot);
  server.on("/on", handleOn);
  server.on("/off", handleOff);
  server.begin();
}

void loop() {
  server.handleClient();        // answer browser requests
}

✓ Check: Tapping ON lights the user LED and the page heading changes to "ESP32 LED is ON"; OFF turns it off.

Troubleshooting

Problem Likely cause Fix
No port appears in Tools → Port Charge-only cable, non-standard USB-C cable, or missing USB-serial driver Try a known USB-A to USB-C data cable. If the power LED is on but there is still no port, read the small chip next to the USB-C connector and install its driver (for a CP210x chip: CP210x driver (Silicon Labs)), then reconnect.
Upload fails or stops part-way Upload speed too high for the USB cable or USB chip Tools → Upload Speed → 115200, then upload again.
"Failed to connect to ESP32: Timed out waiting for packet header" Board did not enter download mode automatically Click Upload, and when "Connecting……" appears hold BOOT for 2 seconds, then release.
Upload fails only when wires are connected A strapping pin (GPIO 0, 2, 5, 12 or 15) is pulled to the wrong level at boot Disconnect parts from those pins while uploading, or move them to other GPIO.
Serial Monitor shows random characters Baud rate mismatch Set the Serial Monitor to 115200 baud.
Serial Monitor is blank after uploading The start-up message was printed before the Serial Monitor opened Press EN (reset) once with the Serial Monitor open.
"Brownout detector was triggered" and the board restarts Supply voltage dips when Wi-Fi starts Use a shorter/better cable or a powered USB port; do not power motors or LED strips from the board.
Stuck at "Connecting to Wi-Fi……" Wrong password or 5 GHz-only network Check the SSID and password (case-sensitive) and use a 2.4 GHz network.

Try next: add a third button to the web page that makes the LED blink (hint: add a server.on("/blink", …) handler), or read the official Arduino-ESP32 troubleshooting guide if anything gets stuck.

Spotted a problem in this tutorial? Email support@epartners.co.nz and we'll check it and update the tutorial.

Good to know
  • GPIO are 3.3 V only. Putting 5 V on a GPIO pin can damage the ESP32 — use a level shifter with 5 V modules.
  • Use a USB-C cable that meets the USB Type-C standard and carries data. A non-compliant cable may power nothing or show no port; a USB-A to USB-C data cable is the safest choice.
  • GPIO 34, 35, 36 (VP) and 39 (VN) are input-only and have no internal pull-up/pull-down resistors.
  • GPIO 0, 2, 5, 12 and 15 are strapping pins read at boot. Avoid pulling GPIO 12 high at power-up.
  • Wi-Fi is 2.4 GHz only.

Video guide

Resources

FAQ

▸ Which board do I select in the Arduino IDE?

Select "ESP32 Dev Module" after installing "esp32 by Espressif Systems". "DOIT ESP32 DEVKIT V1" also works with this 30-pin layout.

▸ Can I connect 5 V sensors or an Arduino UNO directly?

Not directly — the ESP32 GPIO are 3.3 V. Power 5 V sensors from VIN/5 V if needed, but pass their output signals through a logic level shifter or a resistor divider.

▸ Does it support Bluetooth Classic or only BLE?

Both. The ESP32-WROOM-32 supports Bluetooth v4.2 BR/EDR (Classic) and Bluetooth LE, so you can use the BluetoothSerial and BLE libraries in Arduino-ESP32.

▸ Can it connect to 5 GHz Wi-Fi?

No. The ESP32 supports 2.4 GHz 802.11 b/g/n only. Most home routers broadcast both bands, so join the 2.4 GHz network name.

▸ Why does my computer not see the board?

Usually the cable. Use a USB-C data cable that meets the Type-C standard; charge-only cables do not carry data. If the power LED is on but no port appears, install the USB-serial driver for your computer.

▸ Can I use MicroPython or ESPHome?

Yes. Flash the generic ESP32 MicroPython firmware from micropython.org, or choose board "esp32dev" in ESPHome.

Technical question about this part? Email support@epartners.co.nz with your board and wiring, and we'll help you get it working.

Shipping: $5.99 urban, $9.99 rural. Free shipping on orders of $100 or more.

Order by 10:30am (NZT), Monday to Friday, and we dispatch the same day. Orders placed after 10:30am, on weekends or on public holidays are dispatched the next business day.

Delivery usually takes 1–2 business days after dispatch (2–3 for rural addresses). See our Shipping Policy for full details.

This site is protected by hCaptcha and the hCaptcha Privacy Policy and Terms of Service apply.

Recently viewed